


Is your lower back misaligned? You can get the relief you need by practising yoga.
Have a lower back ache? Rejoin the group. 80 percent of Americans will experience lower back pain at some point in their lives, according to the National Institutes of Health. But just because something is typical doesn't mean you have to put up with it. Every movement you make will be supported and stabilised by your lower back. Your back will feel terrible when it's out of alignment, but your mental health may also suffer. The good news is that yoga can provide you with some sweet, sweet comfort if you suffer from lower back pain.
What part of your lower back hurts the most?
The five lumbar vertebrae at the base of your spine make up your lower back (L1 to L5). The lumbar vertebrae, which support your upper and lower bodies, allow you to move your torso in all directions, are the largest in your spine and protect your spinal cord. To ensure that everything moves smoothly and remains in position, a sophisticated network of ligaments, muscles, and tendons is present as well.
Lower back discomfort is quite frequent because the lumbar region is subjected to tremendous stress and large loads while you walk, run, lift, carry, or do just about anything.
Several conditions can result in lower back pain. When the padding between your vertebrae becomes squeezed and is unable to perform its function effectively, a bulging disc develops. Pinched nerves may result from herniated discs. However, lower back pain frequently represents a strain or rupture brought on by weak muscles.
Why does my lower back hurt?
Long periods of sitting or standing (yes, we're looking at those of you working from home! ), in addition to more common medical conditions like osteoarthritis or a bulging disc, are a major source of lower back discomfort. The longer you sit, the less your stabilising muscles are used, which weakens them and makes it harder for them to function when you need them, which can result in pulled, strained, or sprained muscles (and lots of pain).
Simple tasks like lifting up your child, carrying something heavy, or twisting awkwardly in the automobile might result in lower back pain if your muscles are weak.
Lower back discomfort can be reduced and tight muscles can be strengthened and stretched out with these yoga poses. But keep in mind: move slowly into each pose, and if it aches at any moment, stop. To prevent aggravating your back discomfort, adjust your practise to how your body feels at any given time. Also, be kind to yourself.
8 positions for lower back pain relief
1. Bitilasana / Marjaryasana (Cat-Cow Pose)

During your warm-up, cat-cow is a terrific method to stretch your hips, chest, and back.
Start in the tabletop posture on your hands and knees. Make sure your shoulders, wrists, and elbows are parallel to the floor and that your knees are positioned squarely below your hips. With your eyes fixed on the ground, put your head in the middle.
Lift your sitting bones and chest toward the ceiling as you take a breath in, letting your belly fall toward the floor. Lifting your head, gaze straight ahead. Make sure to hold your shoulders and knees in place as you exhale and curve your spine upward. Don't let go of your head as it descends to the ground.
Follow your breath's rhythm and repeat as often as necessary (10–20 inhales and exhales is a decent number).
Read : The five most effective yoga poses for reducing acid reflux
2. Mukha Svanasana Adho (Downward-Facing Dog Pose)

The Downward-Facing Dog Pose is perhaps the yoga position that the majority of people are familiar with. This exercise can hit all the tight points to loosen up your shoulders, back, hamstrings, and more. It also offers stretching and strengthening.
Start in Tabletop on your hands and knees. Lift your hips up and back, press into your shoulders, and tuck your toes under.
Pull your forearms toward the front of the room by pressing down forcefully with your fingertips and palms. Engage your outer upper arms and roll your inner upper arms toward the wall in front of you. Engage your shoulders, letting the blades to rotate upward and outward away from your spine and toward your outer armpits (upward rotation).
To elevate your hips higher if your lower back feels rounded, slightly flex your knees. Don't worry about straightening your legs; you just need a straight line from your wrists to your shoulders to your hips!
Check that your feet are parallel and hip-width apart by casting your gaze back to them. Finally, relax your neck by letting your head drop freely and look down at your feet. Releasing back to Tabletop Pose or Child's Pose after a few breaths of holding the pose.
Read : The 8 Best Weight Loss Exercises
3. Baby Pose (Balasana)

In addition to being a soothing or restful pose, child's pose offers a terrific stretch for your back and hips.
Kneel down on the ground. Sit on your heels with your big toes touching, then spread your knees about as wide as your hips. After exhaling, place your torso between your thighs.
In order for your hip points to rest comfortably on the inside of your thighs, you should widen your sacrum over the rear of your pelvis and narrow them toward your navel. Lift the base of your skull away from the back of your neck as you lengthen your tailbone away from the back of your pelvis. Your forehead should be on the mat.
Put your hands down and spread your fingers widely as you extend your arms forward. You can take a few breaths or a few minutes to relax here.
Read : Yoga for Beginners
4. Uttanasana (Standing Forward Bend)

may appear to be a simple position, but don't be misled; Standing Forward Bend strengthens your quadriceps, relieves stress, and extends and releases your hamstrings, calves, and hips.
Put your hands on your hips and stand tall in Tadasana. To stretch the front torso, exhale and lean forward at the hips rather than the waist.
If at all feasible, bend your knees straight and place your palms, fingers, or backs of your ankles on the floor just in front of or alongside your feet. Cross your forearms and grasp your elbows if this isn't possible. Lift the sitting bones up toward the ceiling while pressing the heels firmly into the ground. The top thighs should be gently turned in.
Lift your body a little bit when you inhale. Release a little bit further into the position with each exhalation. Let your head dangle between your shoulder blades from the root of your neck, which is located deep in your upper back.
5. Malasana (Garland Pose) (Garland Pose)

Garland Pose strengthens your ankles while stretching virtually every area of your lower back, including your quads, groyne, hips, and torso.
Put your feet as close together as you can and squat. If you can, keep your heels firmly planted on the ground. Alternatively, roll up your mat and place a towel underneath. Widen the distance between your thighs and your torso. As you exhale, lean forward and tuck your body tightly between your thighs.
To assist stretch your front torso, press your elbows on the inside of your knees while making the salutation seal pose known as Anjali Mudra. Maintain for 30 to 60 seconds.
Read : These yoga poses will keep your heart in good condition.
6. Sphinx Pose
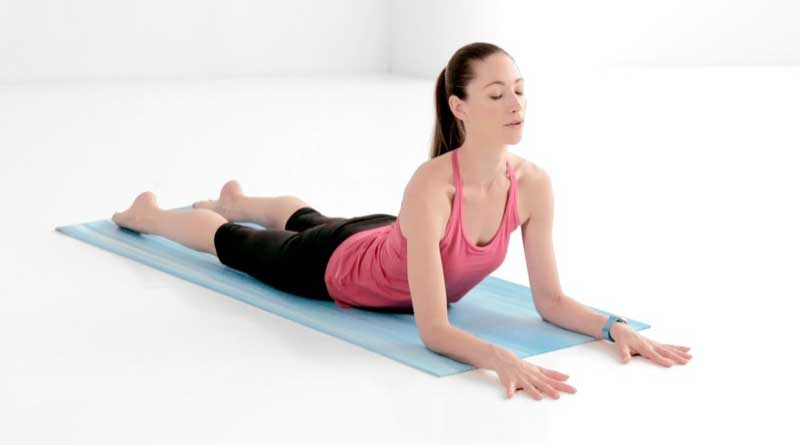
This easy backbend will stretch your chest, shoulders, and abdomen while strengthening your back. It's perfect for beginners or as a warm-up at the start of your practise.
Lie on your stomach with your legs crossed. Your tailbone should be lengthened toward your heels and firmed near your pubis. Then, roll your outer thighs down toward the floor to twist your thighs inside. Your lower back and sacrum, which is the downward-facing triangle bone at the back of your pelvis, are widened and lengthened as a result, protecting them from injury during a backbend. To safeguard your lower back and to ensure that your buttocks are engaged, keep stretching as you enter this pose.
Put your forearms parallel to the ground and your elbows under your shoulders. Take a deep breath in and bend your back slightly by lifting your upper torso and head off the floor. Draw your lower belly away from the floor very slightly—without sucking in, hardening, or becoming rigid—to support and distribute the curve of the backbend more equally over the length of the spine, relieving your lower back. Lower your torso to the floor after remaining for 5 to 10 breaths. If you'd like, repeat.
7. Apanasana (Wind-Relieving or Knees-to-Chest Pose)

Knees-to-Chest Pose's main advantage is that it stretches and calms your lower back, which can lessen lower back pain.
Stretch out completely on your back. Bring your knees as close to your chest as you can as you lift each foot off the ground separately while bending your knees. Hugging your knees to your chest, grasp onto your shins or thighs with both hands. To massage your lower back, gently rock from side to side. Continue to recline fully after spending as much time as you like in this position.
8. Matsyendrasana, Supt (Supine Spinal Twist)

If you have any soreness in your lower back, skip this twisting exercise. Having said that, the Supine Spinal Twist lengthens and relaxes your spine while stretching your glutes and back muscles, which is excellent for easing a stiff or aching lower back.
Lay flat on your back with your arms at shoulder level out to the sides to form a T. Lift your feet off the ground while inhaling as you bend your knees and pull your knees over your hips to form a straight angle with your legs. As you exhale, allow your knees to sag to the right. Your shoulders should remain on the mat. As you turn to the right, your left hip will rise. Hold for a minute or two. Return your legs to the middle and exchange sides.
Read : Yoga: What You Need To Know


No comments:
Post a Comment